How to tighten the FSD bolt for Ooni Koda 16Updated a year ago
### If you experience the flame cutting out with your Ooni Koda 16, it's
important to carefully follow the outlined steps in this article ([The flame
in my Ooni Koda 16 is cutting out](https://support.ooni.com/en_us/the-flame-
in-my-ooni-koda-16-is-cutting-out.-what-should-i-do-rko5aAOzj)) before
proceeding with the following instructions.
### Your oven has a built-in safety feature known as an FSD (Flame Supervision
Device). This mechanism automatically shuts off the gas supply if the
thermocouple fails to register a sufficiently high temperature.
###
### Over time, the FSD bolt connecting to the thermocouple might gradually
loosen. This loosening can potentially cause your flames to unexpectedly cut
out. Regularly checking and tightening the FSD bolt can help ensure the
consistent and safe operation of your oven.
**Note: **If you encounter difficulty with the screws, apply a gentle over-
tightening until you hear a distinctive '_click_.' This will effectively
disengage the screw, making it easier to be removed.
### ** ⚠ BEFORE YOU BEGIN:**
---
* #### Switch off Ooni Koda 16 and disconnect from any gas source
* #### Ensure that Ooni Koda 16 is completely cool
* #### Work on a clear surface in a low-dust workspace
* #### Gather tools required
* #### Philips Head Screwdriver
* #### 8mm (5/16") spanner or adjustable wrench
* #### Remove the stone baking board from the Ooni Koda 16
* #### Collapse Ooni Koda 16's legs and then gently lay Ooni Koda 16 upside-down on a soft surface to prevent any scratches or damage to the top shell
### **⚠ WARNING:**
* #### Failure to follow all instructions could result in serious injury and/or property damage.
* #### Some parts may contain sharp edges. Wear protective gloves if necessary
* #### If you smell gas:
* #### Shut off the gas supply
* #### Extinguish any open flame
* #### If the smell persists, keep a safe distance and contact your local fire department
* #### Read and follow all safety instructions, assembly instructions and care instructions before attempting to assemble and cook.
**Step 1**** \- Position your oven****.**** **Gently lay your Ooni Koda 16
upside-down on a soft surface to prevent any scratches or damage to the top
shell
**Step 2 - Disconnect your gas hose and regulator.** For instructions on how
to remove the gas hose from your oven, view this article: (Insert article)
**Step 3 - Remove the control dial. ** Carefully remove the control dial by
pulling it off of the valve

**Step 4 - Remove collar screws.** Using a Phillips screwdriver, unscrew the
fixing collar screws counter-clockwise. Set the screws aside for reassembly

**Step 5 - Remove the collar.**

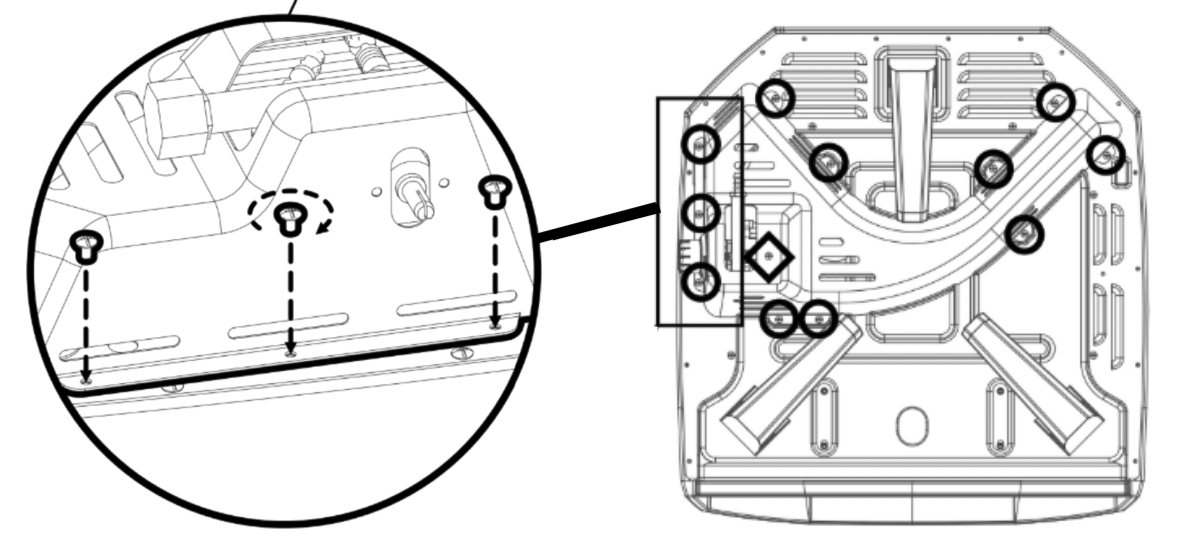
**Step 6 - Remove Control Box Cover****.** Using a Phillips screwdriver,
remove the 11x 6mm black control box screws. Set aside for reassembly.


**Step 7 - Remove Valve Fixing Screw.** Using a Phillips screwdriver, remove
the black screw (1x 10mm) that secures the gas valve to the black control box.
Set screw aside for reassembly.

**Step 8 - Remove the Control Box**. Carefully remove the Control Box, taking
care to manoeuvre it clear of the gas terminal and stem valve.

**Step 9 - Tighten the FSD Bolt.** Locate the flexible copper tubing which
terminates into a small brass fitting (this is the FSD bolt). Using an 8mm
(5/16") wrench, loosen the brass fitting by turning counter-clockwise then re-
tighten turning clockwise until secure. Do not over-tighten.


**Step 10 - Reassemble Control Box. **Gently place the black control box in
position, carefully ensuring that the gas terminal and stem valve are both
accessible. Align the bolt holes with the oven body
**Step 11 - Reassemble the Gas Valve to Control Box. **Align the bolt holes
and using a Phillips screwdriver, screw in 1x 10mm screw clockwise until
secure. Do not over-tighten
****
**Step 12a - Reassemble the gas collar and control dial.** Using the gas
valve stem, secure one fixing bolt using a Phillips screwdriver. Tighten the
bolt only partially, leaving adequate space for the control collar to be
positioned over it. (As shown below)

**Step 12b - Reassemble the gas collar and control dial. **Place the control
collar then secure the other fixing bolt. Proceed to screw in both fixing
bolts fully. Do not over-tighten.

**Step 12c - ****Reassemble the gas collar and control dial. **Push the
control dial back onto the stem

**Step 13 - Replace Control Box Screws** \- Using a Phillips screwdriver,
screw in the remaining 11x 6mm control box screws clockwise until secure

**Step 14 - Reattach gas hose and regulator. For instructions on how to
attach the gas hose to your oven, view this article: **[**How do I attach and
detach my gas hose?**](https://support.ooni.com/en_us/how-do-i-attach-and-
detach-my-gas-hose-to-the-oven-or-gas-burner-S1c3UiQV6)
### **If your Ooni Koda 16 has a Control Box Panel. **
**Step 1 - Position your oven**. Gently lay your Ooni Koda 16 upside-down on
a soft surface to prevent any scratches or damage to the top shell
**Step 2 - Remove Control Box Panel.** Using a Phillips screwdriver, remove
the 6x 6mm screws and panel. Set aside for reassembly.
****
**Step 3 - Tighten the FSD Bolt. **Using an 8mm (5/16") wrench, loosen the
brass fitting by turning counter-clockwise then re-tighten turning clockwise
until secure. Do not over-tighten.**
**
****

**Step 4 - Reassemble**** Control Box Panel.** Using a Phillips screwdriver,
replace the control panel securing the 6x 6mm screws. Set Do not over-tighten
****
If the above steps haven 't solved the issue, [submit a support
request](https://support.ooni.com/contact/contact-form-Sy8evcfa) and we'll be
able to help.